WebIO Version 3 with Wireless Temperature Sensors
WebIO v3 allows you to read wireless temperature sensors located in your home or office,
indoors or outdoors, from over the Internet via WebIO's internal web pages
and/or PC monitor/notification software.
If you ever wanted to be able to check the temperature of your vacation home while your away,
from over the Internet, using your cell phone or smartphone or computer, WebIO v3.5 lets you do that.
Using three wireless sensors you can now read the temperature and humidity of your garage,
basement and main floor all from the WebIO temperature webpage.
When using WebIO with the WebIO-TM PC software on a local or remote PC, you can monitor notify and configure
control automation on more then 10 wireless sensors.
This allows you to set temperature thresholds for sending
email and SMS/text alerts and set automatic control of X10 connected devices such as air duct fans
and lamps based on temperature thresholds.
This WebIO v3 includes all the X10 control features
of WebIO v2. with the addition of a wireless receiver for reading
of wireless temperature sensors.
Version 3.3 also provides the additional option of using an external wireless X10 transmitter
as an X10 transceiver or using any one of the Powerline X10 transceivers supported by version 2.2.
WebIO version 3 features:
-
Easy to install, no PC required for core set of features, embedded device reliablilty
-
Embedded Web server providing web page interfaces for remote Internet access
via PC or Smartphone
-
Web interface for X10 control and query features of version 2
-
Internal webpage support for 3 wireless temperature sensors, plus 1 internal temperature sensor
-
Support for more than 10 wireless sensors when using the WebIO-TM PC software
-
Email and SMS/Text notification and control automation based on temperature thresholds using the WebIO-TM PC software
-
Support for wireless X10 transmiter (Firecracker) with special cable. (when used, replaces X10 powerline controller)
-
CGI programs supporting your own external web sites using HTML, Javascript, AJAX, etc. Version 3.3 adds CGI for temperature sensors
-
Self contained/internal user configured X10 and relay automation triggered by wireless temperature
readings, no PC software required (new to WebIO 3.8).
|
|
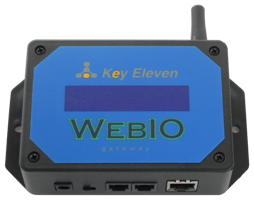
WebIO v3 showing connection panel and antenna.
Updated photo (January 2012), showing WebIO v3 without an LCD display.
WebIO v3 does not have an LCD display as did older versions of WebIO.
Note: WebIO v3.8 has an internal antenna rather than the external antenna (September 2012).
Connect to a live WebIO v3 Server and demo wireless temperature reading by selecing temperature link
in navigation menu:
WebIO v3 Demo
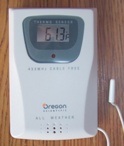
A supported wireless sensor with temperature probe. Model THC268.
|
|
| Wireless Temperature and Humidity Sensors |
Wireless Temperature and Humidity Sensors
WebIO v3 receives from Oregon Scientific brand wireless sensors
which can be purchased from on-line stores
or at local stores such as Target, Best Buy and Radio Shack.
WebIO v3.3 supports sensors of the models displayed and more.
Other Oregon Scientific temperature and humidity sensors that transmit
at 433MHz that have the 3 channel switch may also work with WebIO v3.
Oregon 10 channel sensors are not supported.
Sensors from other wireless sensor manufacturers do not work with WebIO.
(such as sensors from Springfield or La-Cross)
Oregon Scientific also packages sensors with receiver display units.
|
|
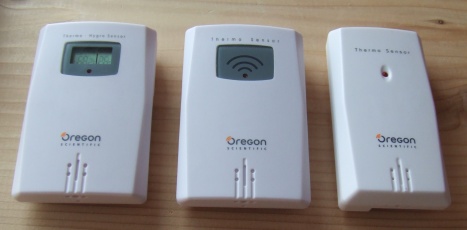
The image above displays 3 WebIO compatible wireless sensors.
From left to right:
-
Model THGR122N temperature and humidity sensor (THGR122NX)
-
Model THN122N temperature sensor
-
Model THN132N temperature sensor
-
Also supported: Model THC268 temperature sensor with probe
|
|
| WebIO Wireless Temperature Webpage |
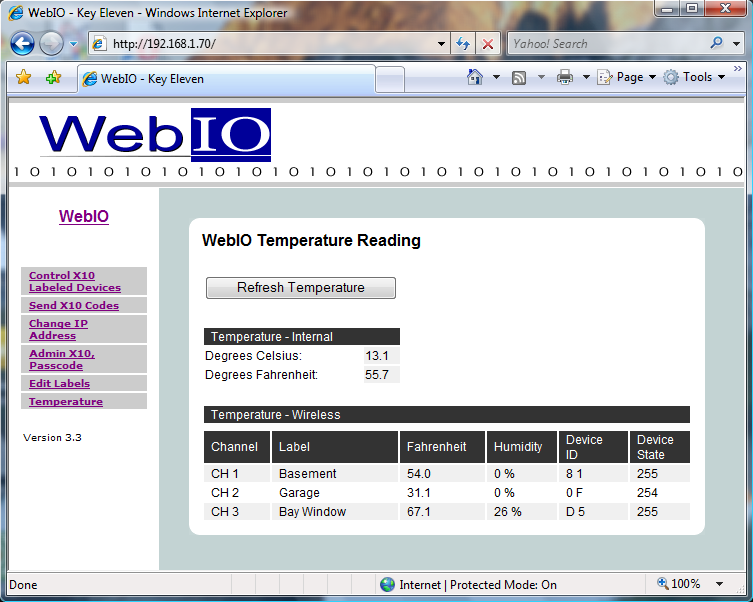
WebIO web page for temperature sensors
The image above shows the WebIO v3 Temperature Sensor Page.
This page displays the internal sensor and up to 3 wireless temperature and/or temperature and humidity sensors.
Each wireless sensor can be assigned a name such as shown above.
Temperature reading is displayed in degrees Fahrenheit.
If you need Celcius instead, make a request when ordering a WebIO (also see WebIO URL API documentation).
Sensors that also provide humidity will display a humidity % value.
Each wireless sensor is designated a channel number of 1-3 using a small switch in the battery
compartment.
Upon sensor battery installation an sensor identifier is generated.
In the case where sensors are assigned the same channel, they are still differentiated
by ID. This can happen where a neighbor also has a sensor designated with the same channel number
as your own sensor.
When WebIO receives a wireless sensor reading, the sensor's status is updated with a number of 255.
Over time this number decriments but is refeshed to 255 upon each sensors wireless reading.
This gives an indication of time passed since last reading, such that if a wireless sensor reading is not received
over a long period of time the status will lower and could eventually become a value of 0,
indicating that the last know reading is
old. (where a value of 0 indicated several hours since last reading).
|
|
|
|
| WebIO Version 3 System Features |
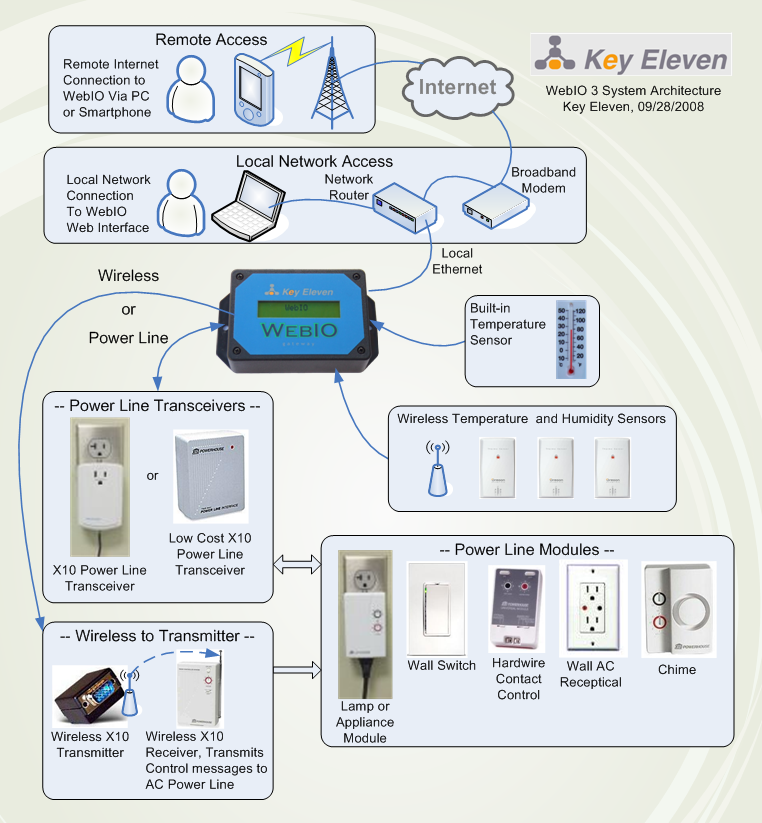
The image above shows the WebIO v3 system features
|
|
|
|
| WebIO version 3 |
WebIO v3 Wireless Temperature Sensors
WebIO contains a 433Mhz wireless receiver and software protocol for
receiving from Oregon Scientific wireless temperature and humidity sensors.
Although more then three wireless sensors can be used, the sensors
are limited to three channels (1-3). If you have two or more sensors on one channel
WebIO's webpage will only display the most current sensor reading from each channel.
The sensors that work with WebIO v3 are listed above, although more may work but
have not been tested/found to work with WebIO.
WebIO v3 Wireless X10 Transmitter
WebIO works with various X10 powerline transceivers such as the
Powerlinc, PSC05/TW523 and XM10. WebIO v3.3 will also work with the
very low cost Wireless X10 Firecracker transmitter model CM17a.
This requires a special cable (RJ12 to DB9 cable) that allows plugging in
an external Firecracker to the WebIO X10 interface connector (RJ12).
The Firecracker then requires an X10 wireless receiver such as the
TM751 or RR501 to transmit/relay the Firecracker
Wireless signals onto the powerline.
The Firecracker is a transmit only device. This does not allow WebIO to get a status
response from 2-way X10 devices such that WebIO cannot query X10 devices.
The Firecracker as a WebIO X10 interface can provide a very low cost form of X10 control
and be useful to work around problems with a WebIO installation having
direct access to AC powerlines. See Documetation on X10 Transceivers for more info.
WebIO v3 PC Software
WebIO v3.5 comes with the WebIO-TM PC software that will monitor temperature sensors via
WebIO's new UDP network interface. (a CGI interface is also available for developing your
own apps)
WebIO-TM allows you to be sent temperature low and high thresholds
per wireless sensor. This allows for alert notification via email and SMS/text message.
For example: This can allow you to receive an email notification
when a wireless temperature sensor installed at your lake home has had a low reading
of less then 40F degrees.
WebIO-TM software allows for X10 control automation on the same temperature sensor thresholds.
For example: This allows for automating a solar thermal panel air duct fan controlled by an
appliance module to come on when a
specified wireless sensor temperature goes above 90 degrees Fahrenhiet and turn off the fan at
below 70 degrees.

WebIO-TM PC software showing readings from 7 wireless sensors.
More information on WebIO-TM Temperature Monitor can be found in Documentation
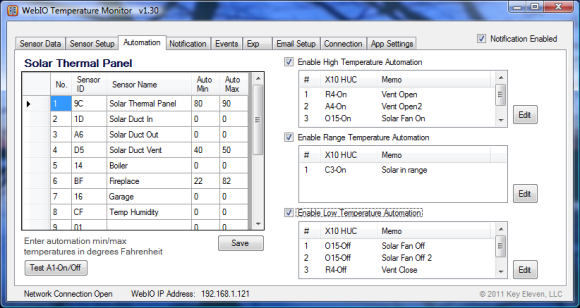
WebIO-TM control automation setup page.
|
|
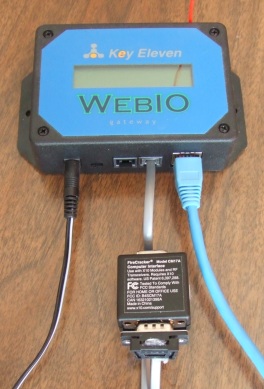
WebIO v3 with Firecracker (Model CM17a) Wireless X10 Transmitter
WebIO version 3
WebIO v3.5 is available.
For purchase see WebIO sales page at: Sales
A Solar Thermal Heating Panel Project
Interenting information on WebIO v3 used to automate a solar thermal heating panel.
Solar thermal heating project
|
|
| WebIO Wireless Temperature Automation |
|
|
WebIO Wireless Temperature Automation
Internal automation based on wireless temperature sensor readings was
added to WebIO v3.8. This automation allows basic control of X10 devices and relays
(Relay board plugged into WebIO EXP port) based on temperature readings.
This Automation is all internal to WebIO, not requiring the WebIO-TM PC software.
Relay board automation controll was added with version 3.8.5.
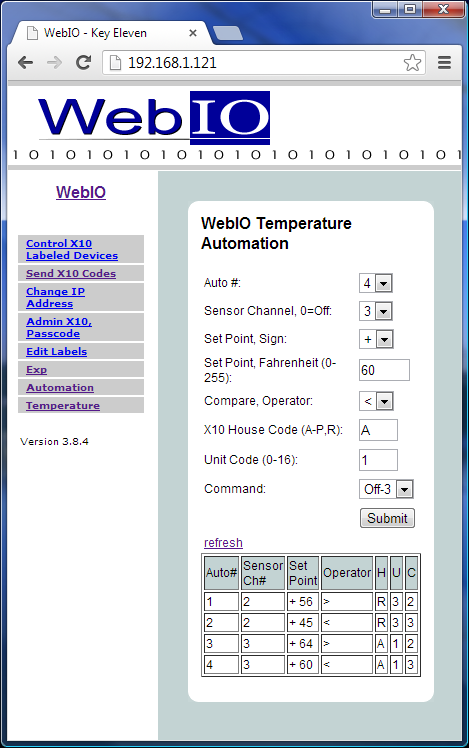
The image to left shows the WebIO internal temperature automation setup web page.
This setup allows you to assign temperature sensor thresholds to an X10 or Relay board action.
The table at the bottom of the page shows the current automation setup.
Only 4 automations can be assigned. Note that multiple assignments can be made to the same sensor,
this allows for multiple actions on the same sensor at different temperature thresholds.
The automation table columns are:
-
Auto# - This the automation number 1-4. Only 4 automations can be assigned.
-
Sensor Ch# - This is the channel number of the wireless sensors (1-3), use (0) to disable/not-use
this automation.
The temperature sensors are assigned a channel using a 3 channel switch on located on the
sensor (usually in the battery compartment).
-
Set Point - This is the temperature threshold in degrees farhenheit.
-
Operator - The math operation applied to the threshold.
Example: if the threshold is +50 and operator is >, then the sensors temperature reading
must be greater than 50 degrees F to trigger the X10 action defined.
-
H - This is the X10 House Code of the device to control (A-P) or Relay (R).
-
U - This is the X10 Unit Code of the device to control (1-16) or Relay number (1-4).
-
C - This is the X10 Command Code of the device to control or Relay state,
(only supports: 2-On or 3-Off).
|
Above: WebIO v3 Temperature Automation Setup
|
|
|
|
In the example shown, these automation assignements are made:
-
Automation #1 - Sensor Ch#2, set point +56 degrees, if sensor reading is >56 then
set Relay #3 On.
-
Automation #2 - Sensor Ch#2, set point +45 degrees, if sensor readign is <45 then
set Relay #3 Off.
-
Automation #3 - Sensor Ch#3, set point +64 degrees, if sensor reading is >64 then
send X10 message to turn X10 device A1 On.
-
Automation #4 - Sensor Ch#3, set point +60 degrees, if sensor reading is <60 then
send X10 message to turn X10 device A1 Off.
Using Internal Automation Setup Web Page
To configure automation you first need to place the WebIO "Lock-Prg" switch into the
"Prg" program position. Remember to place back into "Lock" position when done, if
WebIO boots up in "Prg" position it will restore some settings back to default settings.
To setup an automation select the Automation number 1-4.
Select sensor channel number (1-3), WebIO only supports the 3 channel Oregon sensors.
Use a channel number of 0 to disable this automation.
Select the sign of the set point value (+ or -).
Set the set point value in Fahrenheit (0-255).
Select the compare operator (< or >).
Set the X10 House Code (A-P) or (R) for Relay.
Set the X10 Unit Code (1-16) or Relay number (104).
Select the Command (2=On, 3=Off).
When all settings are defined select the [Submit] button.
Note: Due to WebIO having very limited memory (RAM), some displayed fields are used by
other WebIO features. You will likely see default settings in the Automation Setup fields
that are invalid for Automation settings (these are values from other features sharing the same memory space).
Every time you Submit automation settings or refrest the web page,
reveiw the fields to make sure there valid before submitting.
Also WebIO's sending Network messages takes priority over user submit of settings such that
if WebIO is sending a Network message (UDP temperature sensor message) just as you submit
web page settings, your submit may get ignored and you will have to try submitting again.
|
|
|