WebIO Internet connected Wireless Temperature Sensor
Monitor and Alert Software
Manual
WebIO-TM Beta version 1.20
12/29/2009
The WebIO Temperature Monitor PC software (WebIO-TM) will monitor your local or remote WebIO wireless temperature sensors, send notification and perform temperature based control automation.
WebIO-TM PC software runs on a Windows PC for monitoring a local or remote Internet accessible WebIO (WebIO version 3.5, wireless temperature sensor version).
WebIO-TM features:
Notification allows each wireless temperature sensor received by WebIO to be configured for alert notification on a temperature range as defined by the user. Notification can be sent as an email or SMS text message.
Automation allows each wireless temperature sensor received by WebIO to be configured to send one or more X10 powerline control messages based on temperature high and low thresholds.
Logging of each WebIO wireless temperature sensor reading to a comma delimited file.
Instantly monitors a WebIO located on the same local area network as the PC computer running the WebIO-TM software.
Can also monitor a WebIO on a remote network such as a
WebIO installed at a vacation home. This requires configuration of WebIO.
Contents
WebIO Internet connected Wireless Temperature Sensor
WebIO Network Messages and HTTP-Polling (WebIO-TM v110 only)
Download and Installation
WebIO TM is currently in “Beta” software release for Windows operating system using the .NET framework. This application is a very early release and does not yet have an install package.
This app uses the Microsoft .NET framework which Windows Vista already has. On Windows XP you may need an install program for this app, which has not been created yet.
Just download the attachment/file: “WebIO-TM_v120.zip” and unzip the file. In a folder called WebIO-TM you will find the executable file called “WebIO-TM.exe” run this app.
When first running this app you may get a warning message (pictured below) from Windows announcing that this app is accessing networking functions. Accept this (Unblock). This app uses TCP sockets to periodically connect to WebIO and to connect to your defined email account.
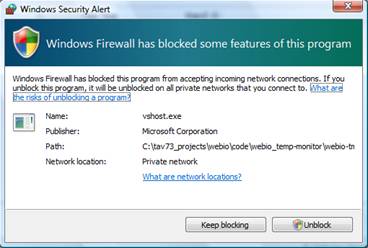
WebIO-TM is intended to work from across the Internet so that you don’t have to run this app on a PC at the same location as your WebIO. Such that a WebIO installed at a lake home can be monitored by this app running on a PC at your home or office.
WebIO Network Messages and HTTP-Polling (WebIO-TM v110 only)
It is important to note that WebIO-TM includes two methods of retrieving sensor events from WebIO:
1. WebIO-TM v1.18 and greater: Network Messages (Default). With this method WebIO sends/relays each wireless sensor reading as a UDP message over the TCP/IP network. These messages are received by the WebIO-TM PC software. This method uses the sensor ID rather than channels to distinguish up to 255 individual sensors (with a practical limit of 20 sensors). Requires WebIO version 3.5 or greater.
2. WebIO-TM v1.10 only: HTTP-Polling. With this method the WebIO-TM PC software periodically polls WebIO for sensor data. This method is limited to 3 channels of sensor data. Notification on 3 channels is supported.
WebIO-TM Version 1.18 and greater: Supports notification, automation, logging and supports more than 20 sensors. Requires WebIO version 3.5 or greater.
WebIO-TM Version 1.01: Only supports HTTP-Polling for retrieving sensor data from WebIO. Supports 3 sensor channels and notification. In some case may be easier to setup for remote monitoring of WebIO.
WebIO-TM Sensor Data page
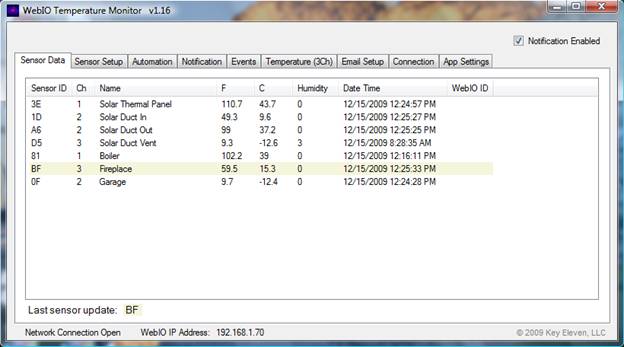
The Sensor Data page displays every sensor reading send from WebIO from over the TCP/IP Network (using the UDP Network Transport Layer Protocol). No configuration is required when used on the same Local Area Network (LAN) as WebIO, as WebIO sends UDP messages using broadcast to address 255.255.255.255 on TCP Port 4040.
The Sensor Data Page/Tab Table displays:
· Sensor ID: the 2 digit hexadecimal sensor ID. Typically each sensor has a unique ID. This ID will likely change when the sensors batteries are replaced.
· Ch: The Channel of the sensor. Since this page shows all sensor readings, it is not limited the 3 sensor channels. You will see that some sensors will share the same channel. (note: some sensor models support 10 channels).
· Name: This is the user defined name for the sensor with the corresponding ID
· F,C: The temperature reported by the sensor in Fahrenheit and Celsius.
· Humidity: The humidity reported by the sensor. Not all sensors measure humidity
· Date Time: The date time of the sensor reading. Defined by the date time that WebIO-TM received the sensor message from WebIO.
· WebIO ID: not yet supported.
The most recent sensor data received is highlighted
with a background color and indicated at the “Last sensor update:” field.
WebIO-TM Sensor Setup Page

The Sensor Setup page/tab is used to define a name for each sensor in the Sensor Registry Table.
To define a name for a sensor, you first need to “discover” the sensors ID. This can be done by viewing the Sensor Data page and waiting for the sensor message to be received. (To force a sensor to transmit you can replace its battery, which also causes the sensor to generate a new ID value).
Once the Sensor ID is discovered, you can add it to the registry of defined sensors by entering the sensor’s ID into the Sensor ID column at the row marked with the “*”. The ID should be entered as a 2 digit hexadecimal value (just as its displayed on the Sensor Data page), using values [0-9,A-F][0-9,A-F]. Next enter a user defined sensor name in the Sensor Name column.
[Save Sensors Setup] button: After add/edit of sensor registry, save sensors. The Sensor Data page will then update on reception of next WebIO sensor message.
Edit Sensors: To change a sensor’s name, just retype a new name over the old one. If a sensor changes its ID, type in the new ID over the old ID for the given sensor.
Sensors are displayed on the Sensor Data page in the order defined by the Sensor Registry Table. Use the [Move Record Order Up]/ [Move Record Down] buttons to move a sensor higher or lower in the list. Be sure so Save changes to your operations when completed.
To delete a sensor, make sure you select the sensor
you wish to delete, the use the [Delete] button. Be sure to save changes when
completed.
WebIO-TM Automation Page
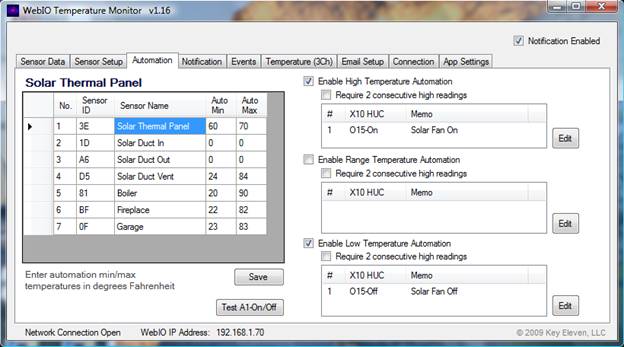
WebIO-TM can perform X10 power line control automation based on wireless temperature sensor readings. When WebIO-TM receives a sensor reading from WebIO, it can perform a list of X10 control automations based on defined temperature thresholds for Low, In-Range and High. When a sensor reading meets a threshold, WebIO-TM executes any defined control automations for the threshold by sending each X10 control command back to WebIO to transmit on the powerline.
Example: A solar thermal panel wireless temperature sensor transmits a reading of 71 degrees Fahrenheit, WebIO receives this sensor message and relays the message onto the TCP/IP Ethernet network. WebIO-TM software receives the WebIO network message, looks up the sensor’s Automation temperature threshold and finds the received value of 71F is greater than the set point max of 70F, triggering automation for high temperature. Since “Enable High Temperature Automation” is set, WebIO-TM executes each X10 Automation defined for high threshold. In this example only one X10 control automation is set “X10 O-15 On” for turning a solar thermal air duct fan On . This “O15 On” command is sent back to WebIO via it’s HTTP interface causing WebIO to transmit “O15-On” message on to the power line causing the AC power line X10 module with address “O15” to turn “On”, turning on the connected air duct fan.
For each sensor requiring automation, set both Auto-Min and Auto-Max (Low and High) set points in degrees Fahrenheit. Then for each threshold (High, Range, Mix) you can define 1 or more X10 control messages.
To add/edit X10 control message, use the Edit button next to the appropriate High/Range/Low list box. This will bring up the Automation Setup screen for defining X10 commands.
Use the Enable (High/Range/Low) Temperature Automation check boxes to enable or disable automation for the selected sensor threshold.
Save: Remember to use the [Save] button to save changes to this page. (X10 commands are saved using [Save] button on the Automation Setup screen).
Use the [Test A1 On/Off] to test sending and “A1-On” an “A1-Off” X10 command to WebIO.
Automation Setup
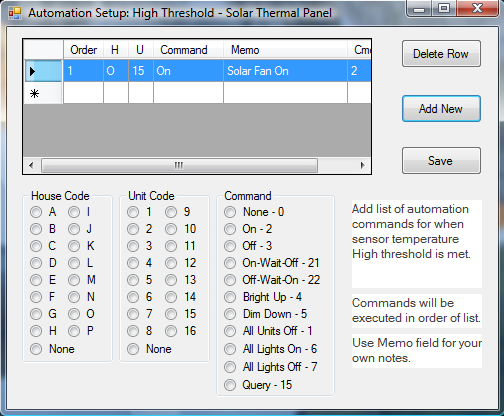
The Automation Setup screen (pictured above) is used to define X10 control automations.
Use the [Edit] buttons on Automation page to open the Automation Setup screen.
One or more X10 commands can be define. X10 commands will be executed in order with about a 1 second gap between executed commands.
Use the [Add New] button to add a new record. Use the radio buttons to define House code, Unit code and Command.
Use the [Save] button to save changes made before closing this screen.
WebIO-TM Notification Page

The Notification Page allows users to set the Normal range for each temperature sensor. When temperature goes below or above the defined range an Email or SMS text message will be sent to the defined “Send Notification Email” address.
Note that for a given sensor only 1 notification will be sent per hour, such that if a sensor goes below it’s min value an email will be sent, but then for the next hour no email will be sent for this sensor. After an hour passes since last notification and the sensor is still below the min value a notification will be sent again. This hour long wait state prevents redundant notification at the WebIO sensor poll rate as defined on the Connection Page.
For each sensor requiring automation, set both a low and high (Notify Min and Notify Max) set point. To then enable notification for the selected sensor, set the “Enable notification for this sensor” check box.
Master Notification Enable: Use the “Notification Enabled” check box in the upper right corner of WebIO-TM app to enable notification or to temporarily disable all notifications.
Each sensor reading can be filtered before a notification would be sent using the following Sensor Notification Flags after selecting a sensor from the sensor list:
· Enable notification: The “Enable notification for this sensor” check box enables notification for this sensor. Otherwise no notification will be sent for this sensor.
· Notify once per state change: When this check box is “checked” notification on the selected sensor will only be send when the temperature goes from in-range to out-of-range. Example: if temperature goes over the set “notify Max” set point, a notification will be sent, but subsequent high readings will not be sent until temperature returns to “in-range” value and back out of range. This helps reduce redundant notifications.
· Require 2 consecutive out-of-range readings: This setting is useful to filter out the rare occurrence of a invalid/corrupted sensor reading.
The “Send notification email/SMS to” field contains the email address or text message address to send-to when a sensor alert requires notification. See page “Email Setup” which is required for WebIO-TM to send emails.
The Send Test Email button will send a test email to the defined “Send Notification” email address.
Also see section “Text Messages”.
Save settings: remember to use the [Save] button after changing settings on the this page.
WebIO-TM Email Setup Page
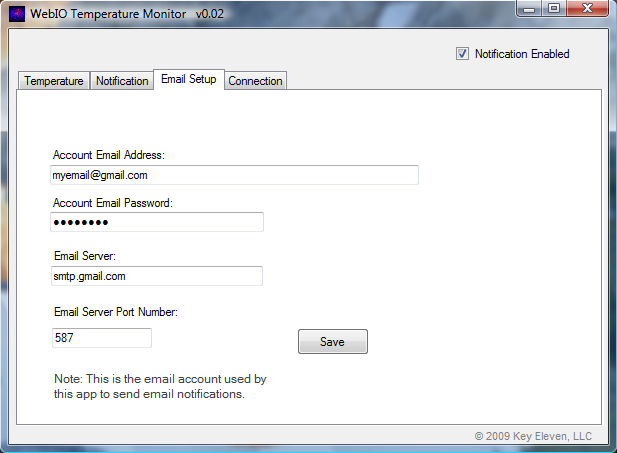
The Email Setup page is used to configure the email server account used by this app to send emails and text messages.
WebIO Temperature Monitor requires a connection to an email account for sending email or text message notifications.
gmail or other email providers can be used as the Account Email Server for sending WebIO Notifications.
You may want to create a new account for this app.
For example, with gmail you will need this info:
- Your Gmail information (Username, Password)
- Username is your E-mail address (yourAccount@gmail.com)
- The Gmail SMTP server address (smtp.gmail.com)
- The port Gmail uses (465 or 587)
You will also need to configure your gmail account to accept the POP email protocol. See screenshot file: “gmail_setup_labels.png”
WebIO-TM Connection Page
The Connection page defines the TCP connection from this app to the installed WebIO.
Enter the IP address of your WebIO into the “WebIO IP Address” field and the WebIO TCP port number into the “Port” field.
In the screenshot above the WebIO is installed on a local network (the same network as the PC running this application). WebIO having the LAN IP address of 192.168.1.71 and using the default web server port of 80.
In the case of a remote Internet connected (and routable) WebIO, the IP address would likely be the WAN address of the router of which WebIO is attached behind and have a port number used by the router to forward incoming traffic to WebIO. An example may be a WAN IP Address: 24.116.82.1 and Port: 8087.
Use the Connect to WebIO button to both verify connection to WebIO and to save your IP address info. The WebIO Version field will show your WebIO software version upon successful connection to your WebIO.
The Temperature Poll Interval sets the interval in minutes that this application will poll (connect) to your WebIO to retrieve the current values from the temperature sensors.
Note that a poll rate that is fast/rapid, may interfere with concurrent use of your WebIO, such that when its being asked/polled for sensors values, it may not be available to control X10 devices (for a second or less).
Text Messages
Text Messages are send by sending an email to your network providers proxy server for your phone number.
Example for Sprint network use the following as your “Send To” email address:
{your phone number}@messaging.sprintpcs.com
Example Email Notification
Below is an example body content of a email notification sent by WebIO-TM.
WebIO
Alert: Solar Thermal Panel
Sensor 0F Garage= 206.3F
Alert @12/29/2009 3:03:53 PM on Range:-40-200
Sensor Log File
All sensor message data is stored in file: SensorEvent.log This file is located in the same directory as WebIO-TM.
To view this file either use the [View Sensor Log] button found on the WebIO-TM Events page/tab or use a text editor (such as notepad) or open the file with spreadsheet software.
The sensor log file is comma delimited for easy import in to a spreadsheet.
Sensor log file values are:
Date Time, Sensor ID, Channel, Degrees Celsius, Degrees Fahrenheit, Humidity
Example log file:
12/2/2009 6:31:38 PM,0F,2,-0.1,31.8,0
12/2/2009 6:31:59 PM,51,2,7.2,45,0
12/2/2009 6:32:18 PM,0F,2,-0.1,31.8,0
12/2/2009 6:32:40 PM,81,1,40,104,0
12/2/2009 6:32:50 PM,51,2,7.3,45.1,0
12/2/2009 6:32:55 PM,BF,3,28.5,83.3,0
12/2/2009 6:33:16 PM,D5,3,16.1,61,42
12/2/2009 6:33:18 PM,81,1,39.3,102.7,0
12/2/2009 6:33:29 PM,51,2,7.3,45.1,0
Statement of Use
Thank you for selecting Key Eleven software and WebIO product.
Key Eleven, LLC cannot be responsible for the merchantability, suitability or use of the product or third party product involved. Incidental or consequential loss, damage, or costs associated with the failure of the product.
A warranty DOES NOT apply to any beta software, any software made available for testing or demonstration purposes, any temporary software modules or any software for which Key Eleven does not receive a license fee. All such software products are provided AS IS without any warranty whatsoever.
WebIO Information
For more information go to:
© 2009 Key Eleven, LLC